CS 424: Computer Graphics, Fall 2013
Lab 9: Blender Animation
We continue with Blender this week, this time concentrating on animation. It is important that you read Section 14 before working on the lab. (We will not use the "sequencer" that is covered in the last part of that section.)
You already started a Blender work folder for Lab 8. You should add the work that you do for Lab 9 to that folder. Remember that all of your Blender work, for both labs, is due next Tuesday, October 29, at the start of Lab 10. By that time, you should copy your blender work folder to your homework folder in /classes/cs424/homework.
Exercise 1: Keyframe Animation and Rotational Motion
Blender uses keyframe animation. If you have not already experimented with keyframe animation, you should do so before starting this exercise. You should know how to insert keyframes and how to use the playback controls at the bottom of the Blender window to see a preview of the animation.
The first exercise of the lab requires you to implement rotation and to do so in a hierarchical model. That is, you must make an object rotate and you must parent that object to another object that has its own rotation. The child object thus has its own rotation but also has the rotation that it inherits from its parent.
Getting something to rotate forever at a constant speed is not so easy. The technique is discussed in the "Keyframe Animation and F-Curves" section of Section 14 and was demonstrated in class. You can duplicate one of the following projects, or you can design your own example, as long as it meets the requirement.
For my first example, I made two cubes that rotate around their y-axis at different speeds. I added a bar (made by scaling a cube) and parented the two cubes to the bar. Then, I made the bar rotate around its z-axis. I added a conical base to make the scene look better. To see the animation on a web page from the notes, click here. Here is one frame from the animation:

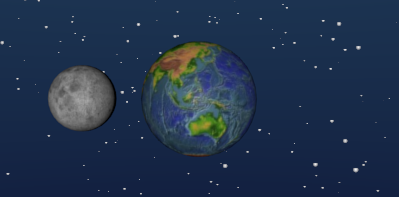
For my second example, I made an "Earth/Moon System," but with no regard for the scale or speeds of rotation of the actual earth and moon. I made two spheres and applied the textures earth.jpg and moon.jpg from /classes/cs424/textures-for-blender. (Note: It was essential to set the "Projection" to "Sphere" in the "Mapping" section of the Texture controls to get the images to map properly to the spheres.) I made the spheres rotate at different speeds about their z-axes. To make the Moon rotate about the Earth, I placed an Empty object at the origin, parented the Moon to the Empty and made the Empty rotate about its z-axis, carrying the Moon along with it. (I couldn't just parent the Moon to the Earth, since I wanted the speed at which the Moon rotates about the Earth to be different from the speed at which the Earth rotates.) Here is one frame from the animation:
You should create an animation in "Ogg Theora" format, at a resolution of about 320-by-240. The name of the animation file should be something like "Lab9-Ex1.ogg". You should also save your work in a Blender file with a name like "Lab9-Ex1.blend". Place both files in your Blender work folder.
Exercise 2: Particles and Path
For the second exercise, you should make an animation that combines path animation with a particle system. For a particle system, you need to have a mesh object to act as an emitter. Planes, mesh circles, and spheres are often used for this purpose. In your animation, you should move the emitter for your particle system using path animation. That is, you should create a path and configure the emitter to move along that path.
Try to make the animation look like sparks being emitted by a sparkler or magic wand as it is waved about. Use a Halo material on the emitter to get particles that look more like sparks. You should experiment with the various particle system controls to set the number of particles, their lifetimes, their initial velocities, and the effect of gravity and maybe other forces.
Save a Blender file and an animation file in your blender work folder, using names such as "Lab9-Ex2.ogg" and "Lab9-Ex2.blend".
Exercise 3: One More Animation
For your third exercise, you should pick (at least) one of the animation techniques that was not covered in the previous two exercises: lattice deformation, wave modifier, explode modifier, animation with hooked vertices. Create an animation that uses that technique. Try to make something interesting!
Save a Blender file and an animation file in your blender work folder, using names such as "Lab9-Ex3.ogg" and "Lab9-Ex3.blend".