As we approach the end of the semester, this will be our last regular lab. It is a short lab on textures, where you will use a couple of the techniques that were covered in class last week and in Section 4.5. In particular, the lab requires you to load a texture by hand, without using Java's Texture class, and to apply a texture transformation. It is possible that you will have extra time during today's lab period; in that case, you can use the extra time to work on final projects.
During next week's lab period, you can work on your final projects. Your Blender animation project is due at the last lab period on Tuesday, May 4. Your OpenGL project is due at the scheduled final exam period, on Sunday, May 9, at 1:30 PM.
To start the lab, you should add a copy of the package directory /classes/s10/cs424/texturepaint to your Eclipse OpenGL project. The program defined in this package depends on classes from glutil, so that will also have to be added to your project; you can find a copy at /classes/s10/cs424/glutil.
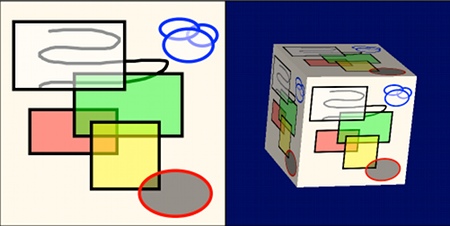
You will be working in the file TexturePaint.java. The modifications that you will have to make are all in the display() method, although you might want to add a subroutine to do part of the work. The TexturePaint program uses a basic painting program from Exercise 12.2 of my Java textbook. The painting area from that program occupies the left-hand side of the TexturePaint window. The right-hand side is a GLJPanel that shows 3D objects. One object of the program is to use the image from the painting area as a texture on the 3D object shown in the OpenGL area. Here's a screen shot from the completed program showing the drawing and a textured cube:
The first exercise for this lab is to load the color data from the picture into the OpenGL 2D texture target, without using Java's Texture class. You should use the OpenGL method glTexImage2D directly. The display() method already gets the BufferedImage that contains the picture. You just have to load the color data from this image. Don't forget that OpenGL 2D texture data starts at the lower left corner, while the data in a BufferedImage starts at the upper left!
The second exercise is to apply a texture transformation. The program has two sliders that specify a rotation angle and a translation amount. The display() already gets the values from these sliders. The rotation angle is a number between 0 and 359. The translation amount is a number between 0.0 and 1.0. You should apply a texture transformation that does the following: First, the texture should be rotated about its center through a counterclockwise angle equal to the specified rotation amount. Then, the rotated texture should be translated in the positive x-direction by an amount equal to the specified translation amount. When this is done, you should see the texture move as you drag the sliders.
Your completed project for this lab should be copied into the homework folder no later than the start of next week's lab.