CPSC 441, Fall 2014
Lab 4: Linux Servers
We have been talking about the HTTP, SMTP, and DNS. In this lab, you'll learn a little about how servers for these protocols can be set up and administered under Ubuntu Linux Server.
You will be using the VirtualBox virtual machine that you created for Lab 1. Make sure that you remember how to start it up and log in, and recall that the sudo command is used to execute commands with administrative privileges.
This lab is due at the start of class next Friday. The web server that you wrote for Lab 3 and Lab 3b should be copied to your homework folder in /classes/cs441/homework today. Please remember to set the directory for your web server to /classes/cs441/javanotes7 so that I can test it more easily!
Some Preliminaries
Start up the VirtualBox applications, but don't start your VM (virtual machine) yet. Before you start, make a "snapshot" of the current state of the VM. A snapshot recordes the entire current state of the VM, so that you can return it to that state later. This allows you to experiment without worrying that you will completely mess things up — if you do, you can just restore the snapshot. And making snapshots allows you to try things out, without committing to keeping them.
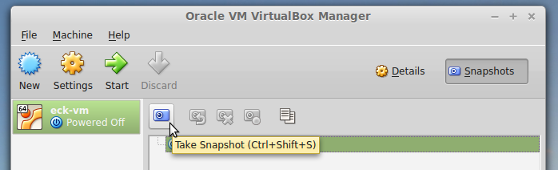
To make a snapshot, click the "Snapshots" button at the top right of the VirtualBox window, then click the "Take Snapshot" icon:
Name the snapshot anything you want. Note that you can only do this when "Current State" is selected in the area below the icons. To revert to a snapshot, select the snapshot in the window, and click the "Restore Snapshot" icon. (Do not use "Delete Snapshot"; that discards the snapshot data and makes the current state permanent.) You have the option of making a new snapshot of the current state before restoring the old snapshot, but at least for this lab you will probably want to turn that option off.
Once you have the snapshot, start up your VirtualBox VM (virtual machine), and log in. You will be installing some new software as part of the lab. Before you do that, it's a good idea to run the command
sudo apt-get update
to make sure that your system has the most up-to-date information about available software. (I got a failed installation when I neglected to do this.)
Finally, I would like you to add me as a user to your system. Create a user with username dje and password fred. You can do that with the command
sudo adduser dje
You will be asked to enter a password and some other information (which you can leave blank). The new user's home directory is /home/dje.
HTTP
You have already installed an HTTP server, as part of the "LAMP" server. LAMP stands for Linux, Apache, MySQL, and PHP. The HTTP server program that you are running is apache2. If you start a web browser and enter your VM's IP address as the URL, you will see the default index page, with some basic information about the server. Note that the files for the server are in /var/www/html, and that the configuration files are in /etc/apache.
The Apache2 Web Server is a complex program that has many optional "modules." A module adds functionality to the server. The directory /etc/apache/mods-available contains all the available modules and their configuration files. The modules that are actually being used have copies of the files in /etc/apache/mods-enabled. The commands a2enmod and a2dismod are used to enable and disable modules.
One of the apache modules is named userdir. When this module is enabled, the apache web server will serve pages from users' home directories. It is not enabled by default. Enable it with the command
sudo a2enmod userdir
To get this or any change in the apache configuration, you then have to restart the apache server with the command
sudo apache2ctl restart
The default is that a user's web directory is a folder named public_html in the user's home directory. (On math.hws.edu, we have changed the user directory name to www, by editing the configuration file userdir.conf.)
Now, in addition to the apache web server, you installed PHP as part of LAMP. PHP is a server-side programming language. Apache has a module that enables it to run php programs, and that module is already enabled. However, the default is to not run PHP programs from user directories. (Actually, it's not a good idea to do so, unless you trust all your users...)
Exercise 1: Make the Apache Web Server on your VM execute PHP programs in user directories. You will have finished this exercise if I can ssh to your server with user name dje and password fred, create a public_html folder in my home directory, put a PHP program in that directory, and see the result in a web server. This should happen during the lab while you have your server running.
Exercise 2: For this exercise, you should look at a couple of apache configuration files and check out some of the options that can be configured. The files that you should definitely look at are /etc/apache/apache.conf and /etc/apache/mods-enabled/mpm_prefork.conf. You will find a number of options that are related to things we have discussed about the HTTP protocol and about how web servers are programed. Identify those options, and write an essay about what you find and what sort of configuration could be done by changing the options. This is an open-ended question; don't trivialize it. Your assignment is to think seriously about the design of the server, why the options exist, and what might be done with them. You won't finish this in lab. You can come back and do it later, or you can copy the configuration files to a more convenient location. You could also look at the same files on math.hws.edu. (You can find a list of all configuration options at https://httpd.apache.org/docs/2.2/mod/directives.html, with documentation for each one.)
SMTP
To begin this section of the lab, use the command sudo tasksel to install a mail server. You will have to answer a few questions as the server is being installed. To keep things simple, you should set up the server as a "satellite system" that sends its mail to webmail.hws.edu. The SMTP server that you are installing is called postfix. I always find the posfix configuration to be confusing, and I don't understand all the options.
Exercise 3: Use telnet localhost 25 to contact the SMTP server on your VM. Send an email message to me (eck@hws.edu) from yourself by communicating with the server. Your message should have a subject line that identifies it as your work for this exercise. I will be able to tell that the message came from your VM by looking at the headers in the message.
DNS
To begin this section of the lab, use the command sudo tasksel to install a DNS server. This time, there will be no questions. The server will be installed with the default configuration for a local DNS server.
I want you to observe some of the network traffic generated by DNS queries to your new server. Start up Wireshark on your host computer. Set it to use a filer of the following form, using the IP address for your VM:
ip.src == 172.21.7.XXX or ip.dst == 172.21.7.XXX
and be sure to "Apply" the filter. Start capturing packets on eth0. Back in your VM, use the command
nslookup math.hws.edu localhost
to do a lookup using the DNS server that you just installed. You need to specify localhost as the server, or it will use the HWS name servers that you configured in /etc/network/interfaces. This is the first lookup that your DNS server has ever done. Think about what has to happen. Take a look at the Wireshark log. You'll see a bunch of queries and responses. Some of them are for things you won't understand, such as queries having to do with keys for secure DNS. However, there is a lot that you should recognize as being necessary to find the IP address for math.hws.edu.
Exercise 4: Write a report on the series of queries that were done by the server in order to find an IP address for math.hws.edu. What queries were sent and why, and what responses were received. As part of your answer, figure out why the IP address that was returned for math.hws.edu was the one that is valid outside the HWS network.
Next, edit the file named.conf.options, and modify it to set up the HWS name servers (172.30.0.101 and 172.30.0.110) as "forwarders" for your server. This means that your server will simply forward queries to one of those servers instead of doing the lookups itself. (Be sure to get the syntax right; the first time I tried it, the server wouldn't restart because of the error. When that happend, I found a better error message in /var/log/syslog.) You will need to restart the server with the command
sudo service bind9 restart
Exercise 5: What IP address do you get now if you do nslookup math.hws.edu localhost? Explain the difference from the previous result. Suppose that you would like all DNS queries on your VM to go through the DNS server that is running on the VM. What change would you make to the network configuration in /etc/network/interfaces? Would there be any reason for doing things that way, instead of just using the HWS servers directly. (The answer is yes; figure out why!)
Exercise 6: The configuration files for the DNS server are in /etc/bind. Look at the files db.root, db.local, and db.127 in that directory. What are they for? What do you think db files are for in general? Suppose that you wanted your server to be authoritative for some doman, say cs.hws.edu. Speculate about what you would have to do. You are welcome to do some research on this. The DNS server software that you are using is called bind9.