CPSC 441, Fall 2014
Lab 7: Virtual Network
Back to VirtualBox for this lab—but this time you will work with several virtual machines at the same time, and you will configure them as a virtual network. One of the virtual machines will act as a router, and the others will be on a private network "behind" the router. The router will use NAT (Network Address Translation) to make it possible for machines on the private network to access the Internet.
It should be possible to complete the work for this lab during class. Hopefully, you will be able to demonstrate your network by the end of the class. The only thing to turn in will be answers to a few questions.
This lab is due on Friday, November 7, in class.
Create the Virtual Machines
You will need a couple of new virtual machines to put on the internal network that you are creating. You can make them by cloning the virtual machine that you already have. It is possible to make a clone that uses the (simulated) hard drive of the original machine as a base and only stores the changes that it makes to the drive. When you do this, the clone doen't need much additional space on the (real) hard drive.
Start up VirtualBox. If you made a snapshot of your VM before doing Lab 4, then you can clone the snapshot. That way, you get a clone without the extra configuration and installations that were done in that lab. To do that, click from the "Details" to the "Snapshot" tab in the VirtualBox window, right-click the snapshot name at the top of the list, and select "Clone":
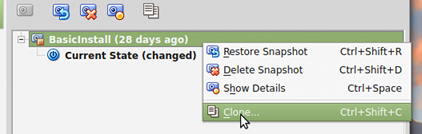
If you don't have a snapshot, you can clone the current state of the VM. (Right-click "Current State" or right-click the machine name in the list at the left edge of the window.)
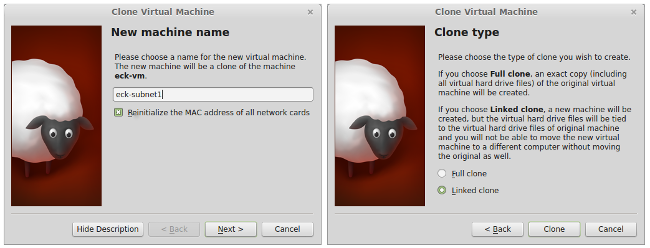
When making the clone, it is important that you use two non-default settings. In the first dialog box, check the option "Reinitialize the MAC addresses of all network cards," and in the second dialog box, select the option "Linked Clone". (Making the linked clone in particular is vital; if you make a "full clone" the entire hard drive of the original is copied.)
Repeat the process so that you have two cloned VM's. These will be the internal computers on your network. I will refer to them as your "internal VM's".
For your router, you can either make a third clone of the original VM, or you can use the original itself. In any case, I will refer to it as your "router VM".
Building the Network
The next step is to set up your virtual network. This is the equivalent of connecting the hosts physically to a network. You do this in the VirtualBox window, since VirtualBox will be providing the simulated network.
Go back to the "Details" tab in the VirtualBox window, where you can work on the VM configuration. Make sure that the VM that you will use as a router is selected in the list of VM's. The router VM needs two network interfaces: the one that it already has that connects it to the HWS network, and another one that will connect to the private network.
To add the network interface, click on the word "Network" in the configuration listing. A Network configuration dialog will pop up. Click "Adapter 2". Then "install" the network card by clicking "Enable Network Adapter." Connect it to the private network by changing the setting of "Attached to" to "Internal Network".
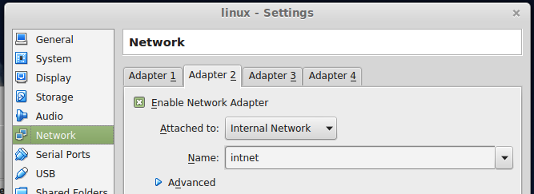
An "Internal Network" in VirtualBox is the virtual equivalent of a link-level switch. You have just cabled your network card to the switch. All the hosts that connect to the same switch will be on the same network. The "Name" of the internal network ("intnet") identifies the switch. By using different network names, you could set up several private networks (although you won't do that for this lab).
Recall that in Linux in the VM, the first network interface is called eth0. The new network interface will show up in Linux as a device named eth1.
You also want to plug your two internal VM's into the private network. Select each VM, open its network config dialog, and set its "Adapter 1" to be attached to the "Internal Network" named "intnet". In Linux on the internal machines, the connection to the internal network will be eth0.
Configuring the Network Interfaces
You've built the network physically (in a virtual sense). Now you have to configure your machines to use it. At this point, you need to design the network. Choose a range of IP addresses for the private network. Use a range from the IP addresses that are reserved for such use. Decide on the netmask that you will use; that is, how many bits in the IP addresses are devoted to the network ID. Select the IP address for the internal interface on the router, and select IP addresses for the other two hosts.
Start up one of your two internal VM's. Right now, it's still using the network settings from the original VM. Recall that the network settings are in the file /etc/network/interfaces. You need to edit that file to change the network settings for eth0. Edit it with
sudo vim /etc/network/interfaces
(In case this is the first time you've used vim, here are the absolute minimum instructions for editing the file: Vim has two modes. You can't edit in the default mode. For that, you need INSERT mode. To enter INSERT mode, press the "I" key. You can then use the arrow keys and the keyboard to edit the file pretty much as usual. Once you've made the changes, hit the ESC key to exit from INSERT mode. To save the changes that you have made and exit, type :wq and press return. (That's a colon followed by a w followed by a q.) If you've messed up and want to exit without saving, type :q! instead.)
You need to figure out exactly what changes you need to make to implement the network that you have designed. But you can leave the DNS entries as they stand, using the HWS DNS servers. When the setup is complete, the internal hosts will be able to access those servers.
You also need to change the network configuration in the other two hosts. The changes for the second internal VM are similar to those for the first. For the router VM, you need to add a new configuration for eth1 to /etc/network/interfaces. You can imitate the config for eth0. However, you don't need DNS settings for eth1; the DNS settings for eth0 are sufficient. (What else don't you need for eth1??)
Restart all your VM's. Use the ifconfig command to check their network configuration. The VM's should already be able to talk to each other over the private network, using their itnernal network IP addresses. You should be able to ping from one VM to the others. You should even be able to ssh from each one to the others. Also, you should be able to use the HWS network from the router VM. If any of this is not working, check your configuration—or ask for help!
However, at this point you will not be able to reach the HWS network from the internal VM's since the router has not yet been configured.
Exercise 1: Tell me the settings that you are using for your network: What is the network number? What IP addresses are you using? What is the netmask? What gateway are the internal hosts using?
Setting Up Forwarding and NAT
By default, a Linux computer does not forward packets between networks, even if it is connected to two networks. You have to enable forwarding. A command that will do that is
sysctl -w net.ipv4.ip_forward=1
Run it with sudo. (You can check whether forwarding is enabled with command
cat /proc/sys/net/ipv4/ip_forward
This contents of the file will be a 1 if ip forwarding is enabled and a 0 if not. This file is part of the /proc file system, a convenient interface to all kinds of system information that you might want to explore some time.)
Now, unfortunately, it doesn't make sense to simply forward packets between the internal and external networks, since machines on the external network don't know anything about the internal network, so there is no way for them to route packets to that network. We need NAT to make things work. NAT in Linux is a function of the firewall system, which is configured using the iptables command. To enable NAT for a private network, you just need one simple command (well, not so simple). The command has the following form:
iptables -t nat -A POSTROUTING -o eth0
                             -s <internal-network> -j SNAT --to <external-ip>
but use sudo, and type everything on one line. The <internal-network> should be the network name for your network, in a form such as 123.45.0.0/21. The <external-ip> is the router's IP address on the HWS network. This command says roughly, "In the table for NAT, add a POSTROUTING rule that applies to packets that will be output to eth0 and that have source IP on <internal-network>; the action (-j) is to apply SNAT (source NAT), changing the source IP address in the packet to <external-ip>". That is, the rule modifies packets originating from the internal network to make them look like they come from the router. POSTROUTING means that the rule is applied after the decision has been made about where to forward the packet. Note that for a TCP connection, this rule will be applied to the SYN packet and then NAT will automatically be applied to all packets going in both directions that are part of the connection. And somehow it also works for DNS queries over UDP.
Once you have entered both of the above commands successfully, forwarding and NAT will be enabled. As soon as you do that, you will be able to reach the Internet from the internal VM's. You should be able to ping math.hws.edu from the internal VM's, and nslookup should work on them.
Exercise 2: Use ssh from an internal VM to log on to one of the lab computers or to math.hws.edu. Use the w command to get a list of logged-in users, and find yourself in the list. What IP address is listed for your connection? Carefully explain why that IP address is the one listed.
Adding Port Forwarding
Although hosts on your private network can access the Internet, there is no way for a host on the external network to open a connection to one of the internal hosts. However, port forwarding can be used to make it possible for an external host to connect to a service running on an internal host. Port forwarding in Linux is another function of the iptables system, and you can set it up with another not-so-simple rule:
iptables -t nat -A PREROUTING -d <external-ip> -p tcp --dport <external-port>
                             -j DNAT --to <internal-ip>:<internal-port>
This rule says roughly: In the table for NAT, add a PREROUTING rule that applies to packets whose destination IP address is <external-ip>, that use the TCP protocol, and that have destination port number <external-port>; the action is to apply DNAT (destination NAT) to the packet by changing the destination IP address and port to <internal-ip>:<internal-port>. PREROUTING means that the rule is applied to a packet that has just arrived at the router, before the decision is made about where to send it.
Your internal VM's are already running web servers. As an example, you should set up port forwarding to make one of those web servers visible on the external network. The web server runs on port 80 on the internal VM. You should set up port forwarding between port 80 on the internal VM and port 8080 on the router VM. That will make the internal web server accessible to external hosts on port 8080 on the router VM. To check that you have succeeded, just access the web sever in a browser using a Location of the form <router-ip-address>:8080.
Making the Router Configuration Permanent
Unfortunately, the configuration that you have done on the router VM is not permanent. It goes away when you shut down the machine. To make it permanent, the relevant commands have to be executed every time the VM boots. One way to make that possible is to add the commands to the file /etc/rc.local. That file is a script that is executed as part of the boot process. You should edit that file and add the three commands that you used to set up forwarding, NAT, and port forwarding. (Put them before the line that says "exit 0"!) You can execute the script to check that you got the syntax correct; just enter /etc/rc.local as a command on the command line. Reboot the computer and check that your complete setup is still in place. Make sure you can still ping from an internal VM to an external host, and make sure you can still access the web server on the internal VM.
Exercise 3: Tell me the exact commands that you added to your rc.local file.
Exercise 4: Demonstrate your working setup to me. If you don't complete the setup in lab, we will need to schedule another time for you to do the demo.
Final Project Ideas
If you are still looking for a final project topic, you might consider doing further work with virtual networking in VirtualBox. One idea is learn more about iptables and how it is used to configure firewalls; you could combine some practical work with iptables with a short paper on firewalls.
Another idea would be to set up a more extensive virtual network using additional Linux configuration and more advanced VirtualBox networking options. It looks like it's possible to make a virtual network that spans several physical computers. The network would be made up of several subnetworks. You would probably still need a short paper.