| CPSC 120 | Principles of Computer Science | Fall 2025 |
Loops provide a powerful shortcut for repetition — instead of cutting and pasting (with lots of small, tedious, error-prone edits) to get multiple copies of something, a loop allows you to repeat things as often as you want with only a few extra lines of code.
Quilts once again provide a good source of inspiration, since quilt block patterns often utilize repetition in their designs and the quilt itself is often constructed from multiple copies of individual blocks. This lab features three traditional quilt blocks.
Successfully completing this lab means that you are able to:
construct sketches using loops, including
work with loops in Processing, including
Hand in a hardcopy (paper) of your worksheet in class.
To hand in your sketches:
Make sure that your name and a short description of the sketch are included in a comment at the beginning of each sketch.
Make sure that you've auto-formatted each sketch.
Copy the entire lab7a, lab7b, lab7c, and lab7d (and lab7e if you did any extra credit) directories from your sketchbook (~/cs120/sketchbook) to your handin directory (found inside /classes/cs120/handin).
It is OK if you copy your files to the handin directory at the very beginning of class.
Presentation meetings for this lab will be the week of Nov 3.
Exercise #4 is the presentation problem. Come to the presentation meeting prepared to discuss your sketch. You may be asked to point out and explain how your code meets the requirements of the problem, explain how portions of your code work, and/or apply skills from the problem to a new situation.
The policies on late work and extensions, academic integrity, and the use of AI for this lab are the same as for lab 2. Review them there.
Review this week's and last week's slides, in-class exercises handouts, and in-class exercise solutions for information, templates, and examples. The slides have some examples of the loop questions and translating the loop question answers into code. Match up the code (solutions for the 10/22 in-class exercises) with the answers to the loop questions (solutions for the 10/27 in-class exercises) for additional examples.
Do the exercises in order.
Read through all of each exercise before you start on it. In particular, note that the "to do this" steps are what you should actually do to complete the exercise — don't just read the first sentence of the problem, look at the example, and try to write the sketch from there. Follow the steps!
Put your name and a description of the sketch in comments at the beginning of each sketch. Also don't forget to Auto Format your code before handing it in.
Be sure to save your sketch frequently (ctrl-S). (Every time you run your sketch is good.) The editor does not auto-save!

In this exercise you'll create a sketch which displays a strip of right-pointing flying geese, as shown. Each "goose" is a triangle whose long dimension is twice the length of the short dimension; for a horizontally-oriented pattern like the one shown, this means the height of the triangle is twice the width.
The requirements for your sketch:
Name the sketch lab7a.
The drawing window should be much wider than it is tall. (You don't need to exactly match the proportions or the number of triangles shown in the illustration.)
Design your sketch so it works with any size window.
Each triangle should span the full height of the window, and the pattern should repeat as many times as can fit fully in the window — leave blank space on the right side if there isn't room for a whole triangle.
The triangles can be any color (but all the same color).
To do this:
Complete the Exercise 1 section of the lab 7 worksheet.
Create a new sketch, add your name and a description of the sketch in comments at the beginning, and save it as lab7a.
Start with the basic sketch structure: open a drawing window and clear the background.
Write the loop to draw the flying geese pattern.
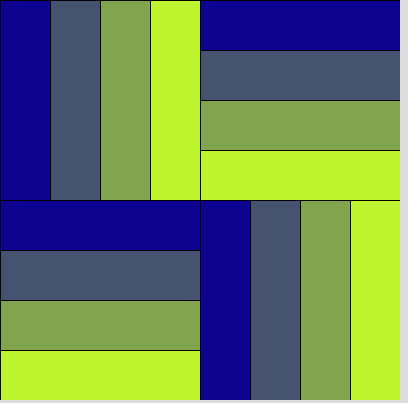
In this exercise you'll create a sketch which which displays a single rail fence block, as shown. There should be four stripes within each quadrant, with a smooth change in the color of the stripes from left to right and top to bottom.
The requirements for your sketch:
Name the sketch lab7b.
The drawing window should be square.
Design your sketch so it works with any size window.
Create two drawing functions: one for the horizontal stripe pattern and one for the vertical stripe pattern.
The block should fill the entire drawing window, and the stripes should be sized so that four strips exactly fill each quadrant.
You don't need to replicate the blue-to-green color scheme shown — feel free to pick your own colors. (But use the same color scheme for all four quadrants.) It's OK to do something simpler and vary just one color component, such as going from red to black, or to vary two or even all three color components.
To do this:
Complete the Exercise 2 section of the lab 7 worksheet.
Create a new sketch, add your name and a description of the sketch in comments at the beginning, and save it as lab7b.
Start with the basic sketch structure: open a drawing window and clear the background.
Write the function definition for the vertical stripe pattern, then use it to draw the upper left and lower right parts of the quilt block.
Write the function definition for the horizontal stripe pattern, then use it to draw the other two parts of the quilt block.
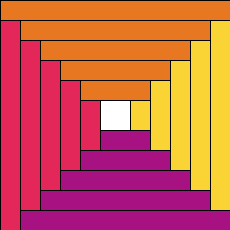
In this exercise you'll create a sketch which displays a single log cabin block, as shown. Pay careful attention to the example so you get details of the pattern correct!
The requirements for your sketch:
Name the sketch lab7c.
The drawing window should be square.
Design your sketch so it works with any size window.
The block should fill the entire drawing window, and each rectangle should be 20 pixels wide (vertical rectangles) or high (horizontal rectangles). While the real quilt block is built from the inside out, yours will be built outside in — include as many rectangles as fit, leaving a blank space in the middle if there isn't enough room to have another complete set of rectangles.
Use four different colors arranged as shown in the example, but you can pick any colors you want.
To do this:
Complete the Exercise 3 section of the lab 7 worksheet.
Create a new sketch, add your name and a description of the sketch in comments at the beginning, and save it as lab7c.
Start with the basic sketch structure: open a drawing window and clear the background.
Implement the loop(s) you've identified, one at a time. Be sure to test your sketch after writing each loop.
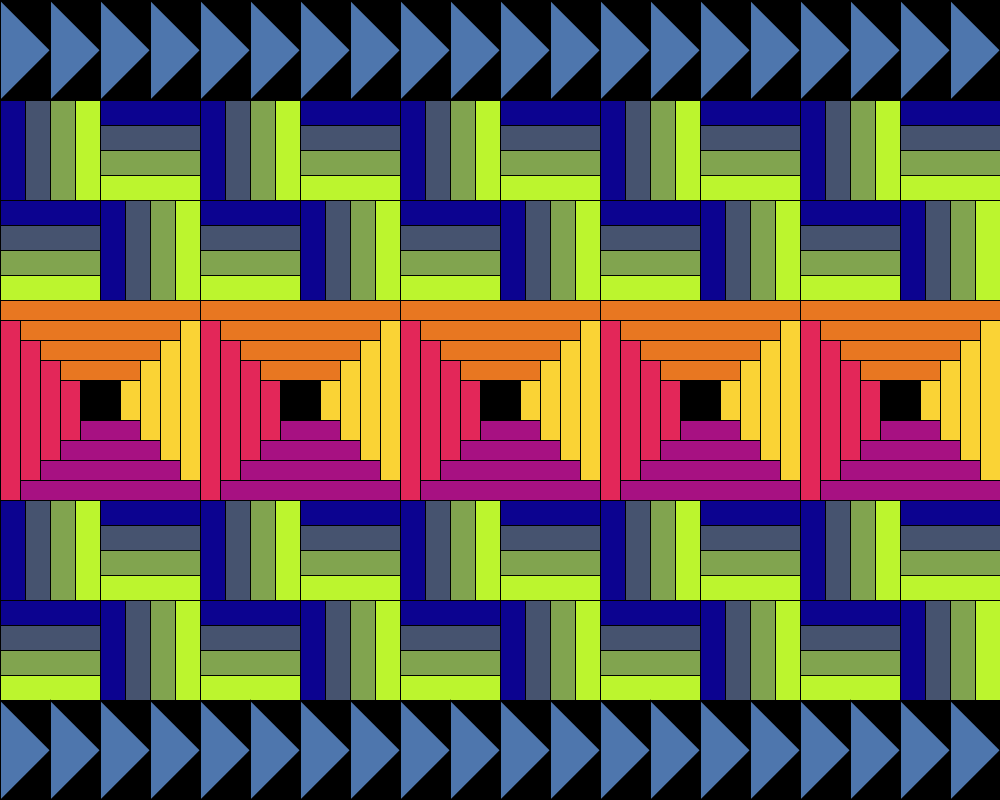
In this exercise you'll create a sketch which displays a quilt made from the blocks created in #1-3, as shown. The requirements for your sketch:
Name the sketch lab7d.
Choose a size for your drawing window so that the blocks fit nicely without distortion or extra space on one edge (in the case of the flying geese).
Replicate the pattern shown: there should be a strip of flying geese at the top, then a row of 5 rail fence blocks, a row of 5 log cabin blocks, another row of 5 rail fence blocks, and a final strip of flying geese. (You can choose your own colors, but otherwise your quilt should match the example.)
There should be a drawing function with appropriate parameters for each kind of block — a strip of flying geese, a single rail fence block, a single log cabin block.
Include comments describing each function and its parameters. For example:
 // draw a tree
 //  (x,y) is the position of the bottom center of the tree trunk

 void drawTree ( int x, int y ) {
   ...
 }
To do this:
Complete the Exercise 4 section of the lab 7 worksheet.
Create a new sketch, add your name and a description of the sketch in comments at the beginning, and save it as lab7d.
Start with the basic sketch structure: open a drawing window and clear the background.
Write the function definition for the flying geese strip, then use it to draw those portions of the quilt.
Write the function definition for a rail fence block, then use it to draw those portions of the quilt.
Write the function definition for a log cabin block, then use it to draw those portions of the quilt.
Challenge yourself and earn extra credit by going substantially beyond the required elements. (See the assignments and evaluation policy for more details on extra credit.)
For extra credit, create a new sketch named lab7e which displays a quilt containing one or more of the blocks described below. For each type of quilt block, you must have a drawing function which draws a single instance of that block. Include at least two instances of each block in your quilt.
Hint: For the twisted square and circular patterns, use of rotate() will be necessary/useful, as may other transformations (translate() and scale()) and the notion of vertex shapes. See sections 14.3, 14.5, and 14.7-14.8 in the textbook.)
Add additional parameters to one or more of the drawing functions in #4:
(Copy the function definition(s) from #4 into your lab7e sketch rather than modifying #4 itself.)
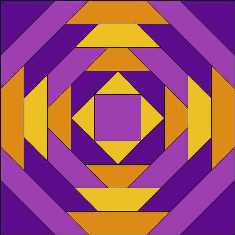
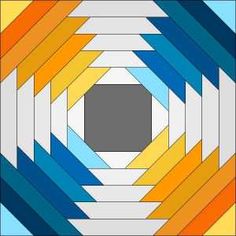
pineapple:
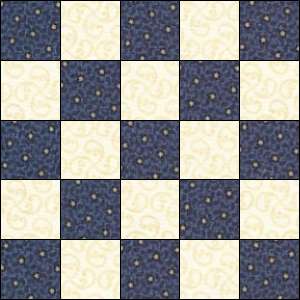
checkerboards and grids:

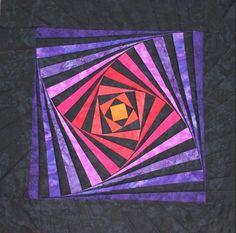
twisted square and variations:


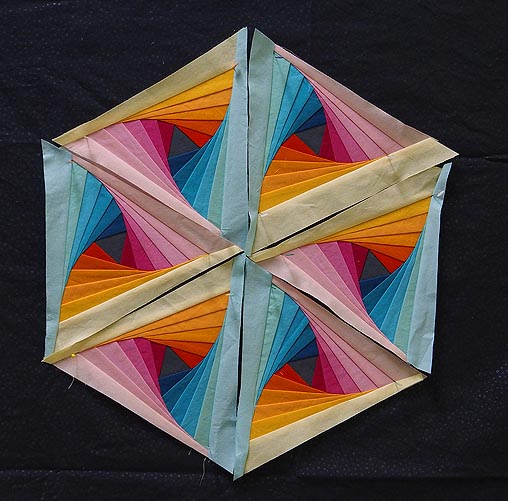
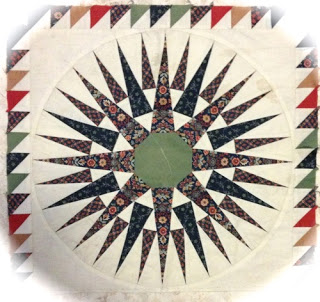
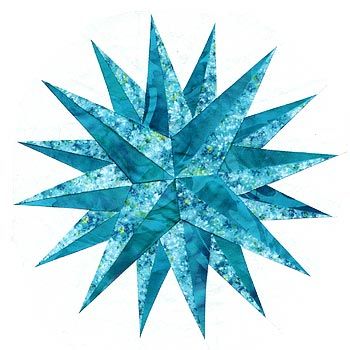
circular patterns (star, Mariner's Compass, NY Beauty):