CS 424: Computer Graphics, Fall 2015
Blender Lab 3: Animation
This is the last of three labs using the 3D modeling and animation program, Blender. You should read Section B.3 in Appendix B of the textbook before doing the lab.
Your Blender work for all three labs should be submitted in a folder named blender inside your homework folder. For this lab, you should turn in a copy of your final your frosty.blend file. You can also turn in a rendered animation, if you want, in the Ogg Theora format. It will be graded no earlier than next Monday, November 9
The Project
You should start with a copy of the file frosty.blend, which you can get from /classes/cs424. It contains a scene of a somewhat forlorn looking snowman in a bleak wintry landscape. In this lab, you will add animation to the scene. The final result should be something like /classes/cs424/frosty.ogg. You can open frosty.ogg in Chrome (or double-click it to open it in animation-viewer application). Besides imitating the sample animation, you will add at least one extra feature, in the last part of the lab.
 The sample animation is 500 frames long. Yours will be at least that long,
but you might make it longer depending on what extra feature you add. You can render
individual frames at any time. In the end, you will probably want to render a complete animation.
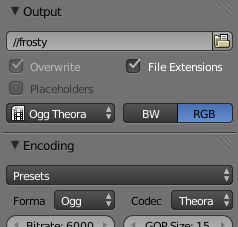
Before you do that, you should set the output destination and
format as shown in the screenshot to the right. The controls can be found under
the "Render" button, which looks like a camera (
The sample animation is 500 frames long. Yours will be at least that long,
but you might make it longer depending on what extra feature you add. You can render
individual frames at any time. In the end, you will probably want to render a complete animation.
Before you do that, you should set the output destination and
format as shown in the screenshot to the right. The controls can be found under
the "Render" button, which looks like a camera (![]() ).
Set the destination folder and file name in the input box just under output. The value "//frosty" will use a file
name that starts with "frosty". The "//" at the start means that the file will be in the same directory as
the .blend file. Below the input box, you will see the output format listed as PNG. You should change that
to "Ogg Theora".
).
Set the destination folder and file name in the input box just under output. The value "//frosty" will use a file
name that starts with "frosty". The "//" at the start means that the file will be in the same directory as
the .blend file. Below the input box, you will see the output format listed as PNG. You should change that
to "Ogg Theora".
Remember that animation files can be quite large. You will make a fairly short animation, and I have already set the Resolution in the Render buttons to 720 by 576, which is fairly small. You have a limited disk quota on our file server. When working with large images and animations, it's easy to use up your disk quota. Even .blend files can get big. You should delete files that you don't need, and empty your Trash occasionally. (By the way, you can see your current disk quota and usage using the command fs listquota on the command line.)
The Hat
Time to start animating! During the first 200 frames, the hat should fly in from off-screen and land on Frosty's head. Use keyframe animation to implement this. In the scene that I set up for you, the hat is already on Frosty's head, where it should be in frame 200. So, you should start in frame 200 and work backwards. Set the frame number to 200 in the animation bar at the bottom of the Blender window, either by dragging the green line or by changing the number in the current frame input box:

Make sure that the hat is the only selected item in the scene, and move the mouse cursor over the 3D view. Hit the "I" key to insert a key frame. (Remember that the mouse cursor must be over the 3D view for keyboard input to go to that view.) You will get a popup menu of quantities that you can animate. You want to select "LocRot", which means that you are inserting keyframe values for the location and the rotation of the hat.
Next, move the current frame to an earlier value (say, 160). Move the hat and change its rotation. Hit "I" to insert a key frame. (It is essential that you change the frame number before moving the hat, otherwise, the changes that you make to the hat will be lost when you change the frame number.
Continue back to frame number one, inserting several key frames along the way. In frame one, the hat should be just off the edge of the visible area. You can check that in the Camera view (Numpad-Zero). Remember to insert a key frame for frame number one.
Note that you can drag the green line back-and-forth along the animation bar to see how the hat moves. You can also click play in the playback controls to let Blender run the animation preview. (Making a rendered animation takes quite a bit longer.)
The Magic
In the next part of the animation, sparks of magic appear around Frosty. The sparks are a particle system emitted by a mesh sphere that moves along a path. This is not an easy effect. Don't forget to save, before you start work on it and at a few points along the way.
The Particle System. To make a particle system, you need a mesh object to emit the particles. For this application, add a mesh sphere to the scene. A sphere can easily emit particles in all directions. Eventually, you will want to make the sphere very small, but you can do that at any time. And for now, it doesn't matter where the sphere is—later, you will move it onto a path.
To add a particle system to the sphere, select the sphere, and then go to the Particle System Buttons
(![]() ). Click the "+" button to add a particle system.
A large number of controls will appear. For a guide to some of them, you can use this
illustration in Section B.3:
). Click the "+" button to add a particle system.
A large number of controls will appear. For a guide to some of them, you can use this
illustration in Section B.3:
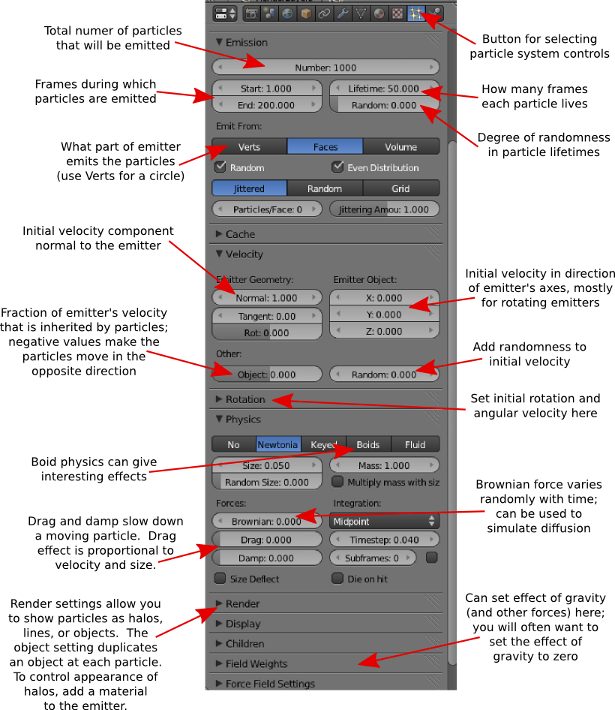
You want the particles to Start in about frame 200, when the hat lands on Frosty's head. They should End about 100 frames later. The Lifetime should be short, about 15 frames. And you probably want to add some Randomness to the lifetimes. The number of particles should be smaller than the default 1000 (my animation only uses 100 particles).
You will have to work on the motion of the particles. Under "Field Weights" near the bottom of the controls, you should turn off the effect of gravity (or at least make it very small). I used some "Damp" to stop the particles from moving too far.
Under the "Render" section of the controls, you should uncheck "Emitter". That will turn off rendering of the sphere. You don't want to see the sphere in the rendered images, only the particles that are emitted by the sphere.
 After making any change, you can see the effect of the change by dragging the green line in the animation
bar. You might need to back up the frame number to the start of the particle animation, to make sure that the
changes take effect.
The Particle Material. If you render a frame with some particles, the particles will show as white blobs. To change that, you need to add a material to the sphere that emits the particles. Select the sphere, go to the material buttons, and hit "New" to add a new material.
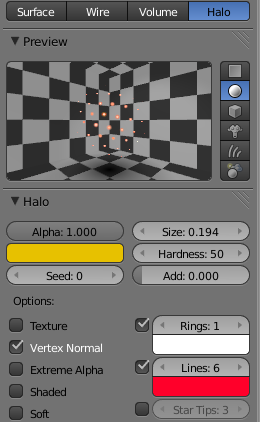
For a particle system, you want to use a "Halo" material. Click the "Halo" button near the top of the material buttons. In the "Halo" controls, you can set the color and size. You can enable Lines, Rings, and Star Tips and set their numbers and colors. The screenshot at the right shows the settings that I used in my animation. Note that you will only see the halos in a rendered image.
The Path. The particle emitter should move along a path as it emits the particles. The next step is to design that path. It doesn't matter where; you can move it and resize it later. It can be useful to work on the path in isolation. Remember that hitting Numpad-/ will show just the selected objects, and hitting it again will return you to the full view.
I used a 3D path that starts inside the hat and winds around Frosty. You don't necessarily have to do the same thing, but here is how I did it...
Put the path into edit mode. Working in a plane (Numpad-7), drag the existing control points to make a curve, then add control points to the end (with Control-left-mouse-click) to make a spiral shape. You still have a 2D spiral (and maybe you could just use that, in front of Frosty). To extend it into 3D, rotate the view so that the plane of the spiral is almost perpendicular to the screen, and drag the control points up or down into 3D. the easy way to do that is by dragging one of the arrowheads on the manipulator that appears at the selected point.
Once you have the shape that you want, exit edit mode, move the path into position, and scale it to the size that you want. (If you used Numpad-/, remember that you need to hit it again to get the rest of the scene back.)
The Path Animation. You want the particle emitter to move along the path. You need to move it exactly onto the path in frame one. This is a little tricky. Set the animation to frame one. Select the path and go into edit mode. Select the first control point. (Be sure to select the starting point, not the ending point. Note that the path has arrows that point in the direction of motion.)
Hit SHIFT-S to call up the "Snap" menu, and select "Cursor to Selected". Exit edit mode. Select the particle emitter. Hit SHIFT-S again, and select "Selection to Cursor". The sphere should jump to the starting point of the path.
Next, select the sphere, and then shift-right-click the path to add it to the selection. Hit Control-P to call up the "Parenting" menu. Select "Follow Path." You have now set up path animation of the sphere. As you change the frame number from 1 to 100, the sphere should move along the path.
Setting the Start Time. Now, here's the problem: We want the sphere to move along the path while it is emitting particles. That is, starting in frame 200. Unfortunately, I found that this simple requirement is tricky to meet. (I had to google the solution.)
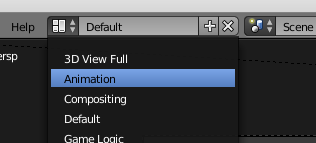
To make it possible to set the start time, you first have to remove a "modifier" from the curve animation. To do that, you need to go the F-curve editing view. You can find it on the "Animation" screen. Use the Screen menu at the top of the Blender window, next to the Help menu, to access the animation screen. Click the icon on the left end of the menu, next to the word "Default" to bring up the list of screens. Select "Animation from the list":
The Animation screen can be used for finer control of animation. F-curves control the interpolation of values between key frames. The F-curve editor is on the lower left, above the animation bar. You will have to drag out a small "plus" sign from the right margin, and then scroll down to reveal the modifier controls:
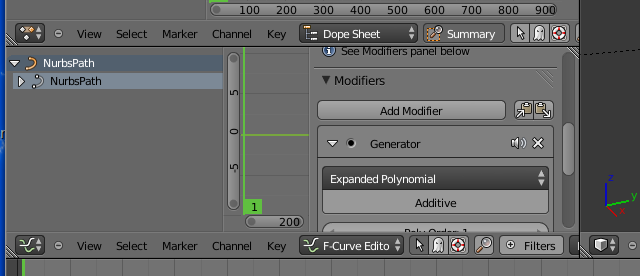
The path must be selected for you to see the modifier here! To remove the offending modifier, click the "X" icon to the right of the word "Generator". You can then go back to the "Default" screen and continue work on the path animation.
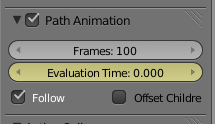 The path should still be selected. Go to the Curve controls, and find the "Path Animation" section.
In the animation controls, set the current frame number to be the starting frame for the path animation (200 or
a little later). In the Path Animation controls, make sure that the "Evaluation Time" is set to zero, as shown
at the right. The Evaluation Time runs from 0 up to the number of frames in the path animation.
Point your mouse at the "Evaluation Time" field, and hit the "I" key to insert a key frame. The field will
change from green to yellow. Move the animation controls to the frame where the path animation should end
(about 300). Set the "Evaluation Time" to 100, point your mouse at it and hit "I" again to insert the
second key frame. Now, as you drag the green line in the animation controls between the two key frames,
the particle emitter should move along the path—while it is emitting particles.
You might take some time to adjust the shape of the path and the properties of the particle system, if necessary.
Frosty Awakens
After all the effort of getting the particle system working, the next segment of the animation is another easy keyframe animation. After the magic, Frosty awakens. He looks up, then looks left and right, then faces forward again, and smiles. Except for the smile, you can implement this by animating the rotation of Frosty's head. (The hat and the pieces of coal that make up Frosty's face are parented to the head, so they move along with it.) You only need rotation keyframes. It's good to put a brief pause between each motion. For example, after you rotate Frosty's head to make him look up, you should have several frames where the rotation doesn't change.
After the head motion, you can make Frosty smile by animating the pieces of coal that make up his mouth. In this case, you are only animating the location of the pieces. You need a starting keyframe and an ending keyframe for each piece. Note that if you just move a piece of coal up, it will also move deeper into Frosty's head, so you will have to move it forward as well. It will probably be easiest to set up this part of the animation if you select the head and the pieces of coal and hit Numpad-/" to zoom in on just those objects.
The Extras
After implementing the animation that I designed, you should add at least one other animated feature to the scene. For example: Make it snow (by putting a mesh plane above the scene and using using a particle system on the plane to create the snow). Have Frosty turn away and move off into the distance looking for adventure (all parts of Frosty are parented, directly or indirectly, to the bottom sphere, so you just have to animate that sphere). Make some trees pop up through the ground at the end. Add a scrolling title at the end that says Merry Christmas. Or maybe Frosty's eyes and the spotlight turn red, he grows fangs, and it says Happy Halloween!
Before rendering the final animation, set the "End" frame in the animation controls to be the last frame number for your animation. When you render an animation, you get the frame numbers between the Start and the End frames. And don't forget to set the output format! You can stop the rendering, if necessary, by hitting the ESCape key.