Section 6.1
The Programmable Pipeline
OpenGL 1.1 uses a fixed-function pipeline for graphics processing. Data is provided by a program and passes through a series of processing stages that ultimately produce the pixel colors seen in the final image. The program can enable and disable some of the steps in the process, such as the depth test and lighting calculations. But there is no way for it to change what happens at each stage. The functionality is fixed.
OpenGL 2.0 introduced a programmable pipeline. It became possible for the programmer to replace certain stages in the pipeline with their own programs. This gives the programmer complete control over what happens at that stage. In OpenGL 2.0, the programmability was optional; the complete fixed-function pipeline was still available for programs that didn't need the flexibility of programmability. WebGL uses a programmable pipeline, and it is mandatory. There is no way to use WebGL without writing programs to implement part of the graphics processing pipeline.
The programs that are written as part of the pipeline are called shaders. For WebGL, you need to write a vertex shader, which is called once for each vertex in a primitive, and a fragment shader, which is called once for each pixel in the primitive. Aside from these two programmable stages, the WebGL pipeline also contains several stages from the original fixed-function pipeline. For example, the depth test is still part of the fixed functionality, and it can be enabled or disabled in WebGL in the same way as in OpenGL 1.1.
In this section, we will cover the basic structure of a WebGL program and how data flows from the JavaScript side of the program into the graphics pipeline and through the vertex and fragment shaders.
I should note that later versions of OpenGL have introduced new programmable stages, in addition to the vertex and fragment shaders, but they are not part of WebGL 1.0 or 2.0, and they are not covered in this book.
6.1.1 The WebGL Graphics Context
To use WebGL, you need a WebGL graphics context. The graphics context is a JavaScript object whose methods implement the JavaScript side of the WebGL API. WebGL draws its images in an HTML canvas, the same kind of <canvas> element that is used for the 2D API that was covered in Section 2.6. A graphics context is associated with a particular canvas. A graphics context for WebGL 1.0 can be obtained by calling the function canvas.getContext("webgl"), where canvas is a DOM object representing the canvas. For WebGL 2.0, you would simply use canvas.getContext("webgl2") instead. The return value of getContext() will be null if the context cannot be created. So, getting a WebGL graphics context often looks something like this:
canvas = document.getElementById("webglcanvas");
gl = canvas.getContext("webgl");  // or maybe canvas.getContext("webgl2")
if ( ! gl ) {
    throw new Error("WebGL not supported; can't create graphics context.");
}
Here, the first line gets a reference to the HTML canvas that WebGL will used throughout the program for drawing. The name gl for the variable is up to you, but I will always use gl for the WebGL graphics context in my discussion. This code assumes that the HTML source for the web page includes a canvas element with id="webglcanvas", such as
<canvas width="800" height="600" id="webglcanvas"></canvas>
In the second line of the above code, canvas.getContext("webgl") will return null if the web browser does not support "webgl" as a parameter to getContext. Since null is considered to be false in JavaScript when used in a boolean context, the third line tests whether the return value is null. In that case, the code throws an error, which can be handled elsewhere, probably by showing an error message to the user. Furthermore, the code will throw an exception if the browser has no support at all for <canvas>. My programs often use an initialization function of the form
function init() {
    try {
        canvas = document.getElementById("webglcanvas");
        gl = canvas.getContext("webgl");  // or "webgl2"
        if ( ! gl ) {
            throw new Error("WebGL not supported.");
        }
    }
    catch (e) {
          .
          .  // report the error
          .
        return;
    }
    initGL();  // a function that initializes the WebGL graphics context
      .
      .  // other JavaScript initialization
      .
}
In this function, canvas and gl are global variables. And initGL() is a function defined elsewhere in the script that initializes the graphics context, including creating and installing the shader programs. The init() function should be called when the page is loaded. This can be arranged, for example, by assigning "window.onload = init;" in the script.
Once the graphics context, gl, has been created, it can be used to call functions in the WebGL API. For example, the command for enabling the depth test, which was written as glEnable(GL_DEPTH_TEST) in OpenGL, becomes
gl.enable( gl.DEPTH_TEST );
Note that both functions and constants in the API are referenced through the graphics context. The name "gl" for the graphics context is conventional, but remember that it is just an ordinary JavaScript variable whose name is up to the programmer.
(Some very old browsers required canvas.getContext("experimental-webgl") to create a WebGL 1.0 context. This includes Internet Explorer 11, but at this point, no one should be using Internet Explorer.)
6.1.2 The Shader Program
Drawing with WebGL requires a shader program, which consists of a vertex shader and a fragment shader. Shaders are written in some version of the GLSL programming language. WebGL 1.0 used GLSL ES 1.00, while WebGL 2.0 can use either GLSL ES 1.00 or GLSL ES 3.00. The discussion here is about GLSL ES 1.00; I will explain some of the changes in the 3.00 version later.
GLSL is based on the C programming language. The vertex shader and fragment shader are separate programs, each with its own main() function. The two shaders are compiled separately and then "linked" to produce a complete shader program. The JavaScript API for WebGL includes functions for compiling the shaders and then linking them. To use the functions, the source code for the shaders must be JavaScript strings. Let's see how it works. It takes three steps to create the vertex shader.
let vertexShader = gl.createShader( gl.VERTEX_SHADER );
gl.shaderSource( vertexShader, vertexShaderSource );
gl.compileShader( vertexShader );
The functions that are used here are part of the WebGL graphics context, gl, and the parameter vertexShaderSource is the string that contains the source code for the shader. Errors in the source code will cause the compilation to fail silently. You need to check for compilation errors by calling the function
gl.getShaderParameter( vertexShader, gl.COMPILE_STATUS )
which returns a boolean value to indicate whether the compilation succeeded. In the event that an error occurred, you can retrieve an error message with
gl.getShaderInfoLog( vertexShader )
which returns a string containing the result of the compilation. (The exact format of the string is not specified by the WebGL standard. The string is meant to be human-readable.)
The fragment shader can be created in a similar way. With both shaders in hand, you can create and link the program. The shaders need to be "attached" to the program object before linking. The code takes the form:
let prog = gl.createProgram();
gl.attachShader( prog, vertexShader );
gl.attachShader( prog, fragmentShader );
gl.linkProgram( prog );
Even if the shaders have been successfully compiled, errors can occur when they are linked into a complete program. For example, the vertex and fragment shader can share certain kinds of variable. If the two programs declare such variables with the same name but with different types, an error will occur at link time. Checking for link errors is similar to checking for compilation errors in the shaders.
The code for creating a shader program is always pretty much the same, so it is convenient to pack it into a reusable function. Here is the function that I use for the examples in this chapter:
/**
 * Creates a program for use in the WebGL context gl, and returns the
 * identifier for that program.  If an error occurs while compiling or
 * linking the program, an exception of type Error is thrown.  The error
 * string contains the compilation or linking error.
 */
function createProgram(gl, vertexShaderSource, fragmentShaderSource) {
   let vsh = gl.createShader( gl.VERTEX_SHADER );
   gl.shaderSource( vsh, vertexShaderSource );
   gl.compileShader( vsh );
   if ( ! gl.getShaderParameter(vsh, gl.COMPILE_STATUS) ) {
      throw new Error("Error in vertex shader:  " + gl.getShaderInfoLog(vsh));
   }
   let fsh = gl.createShader( gl.FRAGMENT_SHADER );
   gl.shaderSource( fsh, fragmentShaderSource );
   gl.compileShader( fsh );
   if ( ! gl.getShaderParameter(fsh, gl.COMPILE_STATUS) ) {
      throw new Error("Error in fragment shader:  " + gl.getShaderInfoLog(fsh));
   }
   let prog = gl.createProgram();
   gl.attachShader( prog, vsh );
   gl.attachShader( prog, fsh );
   gl.linkProgram( prog );
   if ( ! gl.getProgramParameter( prog, gl.LINK_STATUS) ) {
      throw new Error("Link error in program:  " + gl.getProgramInfoLog(prog));
   }
   return prog;
}
There is one more step: You have to tell the WebGL context to use the program. If prog is a program identifier returned by the above function, this is done by calling
gl.useProgram( prog );
It is possible to create several shader programs. You can then switch from one program to another at any time by calling gl.useProgram, even in the middle of rendering an image. (Three.js, for example, uses a different program for each type of Material.)
It is advisable to create any shader programs that you need as part of initialization. Although gl.useProgram is a fast operation, compiling and linking are rather slow, so it's better to avoid creating new programs while in the process of drawing an image.
Shaders and programs that are no longer needed can be deleted to free up the resources they consume. Use the functions gl.deleteShader(shader) and gl.deleteProgram(program).
6.1.3 Data Flow in the Pipeline
The WebGL graphics pipeline renders an image. The data that defines the image comes from JavaScript. As it passes through the pipeline, it is processed by the current vertex shader and fragment shader as well as by the fixed-function stages of the pipeline. You need to understand how data is placed by JavaScript into the pipeline and how the data is processed as it passes through the pipeline.
The basic operation in WebGL is to draw a geometric primitive. WebGL uses just seven of the OpenGL primitives that were introduced in Subsection 3.1.1. The primitives for drawing quads and polygons have been removed. The remaining primitives draw points, line segments, and triangles. In WegGL, the seven types of primitive are identified by the constants gl.POINTS, gl.LINES, gl.LINE_STRIP, gl.LINE_LOOP, gl.TRIANGLES, gl.TRIANGLE_STRIP, and gl.TRIANGLE_FAN, where gl is a WebGL graphics context.
When WebGL is used to draw a primitive, there are two general categories of data that can be provided for the primitive. The two kinds of data are referred to as attribute variables (or just "attributes") and uniform variables (or just "uniforms"). A primitive is defined by its type and by a list of vertices. The difference between attributes and uniforms is that a uniform variable has a single value that is the same for the entire primitive, while the value of an attribute variable can be different for different vertices.
One attribute that should always be specified is the coordinates of the vertex. The vertex coordinates must be an attribute since each vertex in a primitive will have its own set of coordinates. Another possible attribute is color. We have seen that OpenGL allows you to specify a different color for each vertex of a primitive. You can do the same thing in WebGL, and in that case the color will be an attribute. On the other hand, maybe you want the entire primitive to have the same, "uniform" color; in that case, color can be a uniform variable. Other quantities that could be either attributes or uniforms, depending on your needs, include normal vectors and material properties. Texture coordinates, if they are used, are almost certain to be an attribute, since it doesn't really make sense for all the vertices in a primitive to have the same texture coordinates. If a geometric transform is to be applied to the primitive, it would naturally be represented as a uniform variable.
It is important to understand, however, that WebGL does not come with any predefined attributes, not even one for vertex coordinates. In the programmable pipeline, the attributes and uniforms that are used are entirely up to the programmer. As far as WebGL is concerned, attributes are just values that are passed into the vertex shader. Uniforms can be passed into the vertex shader, the fragment shader, or both. WebGL does not assign a meaning to the values. The meaning is entirely determined by what the shaders do with the values. The set of attributes and uniforms that are used in drawing a primitive is determined by the source code of the shaders that are in use when the primitive is drawn.
To understand this, we need to look at what happens in the pipeline in a more detail. When drawing a primitive, the JavaScript program specifies values for any attributes and uniforms in the shader program. For each attribute, it will specify an array of values, one for each vertex. For each uniform, it will specify a single value. It must send these values to the GPU before drawing the primitive. The primitive can then be drawn by calling a single JavaScript function. At that point, the GPU takes over, and executes the shader programs. When drawing the primitive, the GPU calls the vertex shader once for each vertex. The attribute values for the vertex that is to be processed are passed as input into the vertex shader. Values of uniform variables are also passed to the vertex shader. The way this works is that both attributes and uniforms are represented as global variables in the vertex shader program. Before calling the shader for a given vertex, the GPU sets the values of those variables appropriately for that specific vertex.
As one of its outputs, the vertex shader must specify the coordinates of the vertex in the clip coordinate system (see Subsection 3.3.1). It does that by assigning a value to a special variable named gl_Position. The position is often computed by applying a transformation to the attribute that represents the coordinates in the object coordinate system, but exactly how the position is computed is up to the programmer.
After the positions of all the vertices in the primitive have been computed, a fixed-function stage in the pipeline clips away the parts of the primitive whose coordinates are outside the range of valid clip coordinates (−1 to 1 along each coordinate axis). The primitive is then rasterized; that is, it is determined which pixels lie inside the primitive. The GPU then calls the fragment shader once for each pixel that lies in the primitive. The fragment shader has access to uniform variables (but not attributes). It can also use a special variable named gl_FragCoord that contains coordinates for the pixel that is being rendered. To compute pixel coordinates, WebGL must first interpolate the values of gl_Position that were specified by the vertex shader; this gives clip coordinates for the pixel. The interpolation is done by another fixed-function stage that comes between the vertex shader and the fragment shader. (Then WebGL applies the viewport transformation to the clip coordinates to get the value of gl_FragCoord.)
Other quantities besides coordinates use interpolation in much that same way. That is, the vertex shader computes a value for the quantity at each vertex of a primitive. An interpolator takes the values at the vertices and computes a value for each pixel in the primitive. The value for a given pixel is then input into the fragment shader when the shader is called to process that pixel. For example, color in OpenGL follows this pattern: The color of an interior pixel of a primitive is computed by interpolating the color at the vertices. In GLSL, this pattern is implemented using varying variables.
A varying variable is declared both in the vertex shader and in the fragment shader. The vertex shader is responsible for assigning a value to the varying variable. Each vertex of a primitive can assign a different value to the variable. The interpolator takes all the values produced by executing the vertex shader for each vertex of the primitive, and it interpolates those values to produce a value for each pixel. When the fragment shader is executed for a given pixel, the value of the varying variable is the interpolated value for that pixel. The fragment shader can use the value in its own computations.
Varying variables exist to communicate data from the vertex shader to the fragment shader. They are defined in the shader source code. They are not used or referred to in the JavaScript side of the API. Note that it is entirely up to the programmer to decide what varying variables to define and what to do with them.
We have almost gotten to the end of the pipeline. After all that, the job of the fragment shader is simply to specify a color for the pixel. It does that by assigning a value to a special variable named gl_FragColor. That value will then be used in the remaining fixed-function stages of the pipeline.
To summarize: The JavaScript side of the program sends values for attributes and uniform variables to the GPU and then issues a command to draw a primitive. The GPU executes the vertex shader once for each vertex. The vertex shader can use the values of attributes and uniforms. It assigns values to gl_Position and to any varying variables that exist in the shader. After clipping, rasterization, and interpolation, the GPU executes the fragment shader once for each pixel in the primitive. The fragment shader can use the values of varying variables, uniform variables, and gl_FragCoord. It computes a value for gl_FragColor. This diagram summarizes the flow of data:
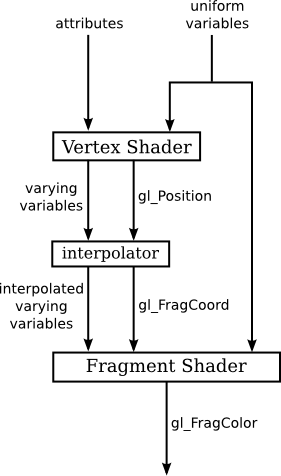
The diagram is not complete. There are a few more special variables that I haven't mentioned. And there is the important question of how textures are used. But if you understand the diagram, you have a good start on understanding WebGL.
For GLSL ES 3.00, the same diagram applies, except that there is no special variable gl_FragColor. Instead, the fragment shader must define its own output variable to represent the color. In GLSL ES 1.00, the words "attribute" and "varying" are used when declaring variables in the actual shader program source code. In source code for the 3.00 version, attribute variables become "in" variables, since they are inputs to the vertex shader, and varying variables become "out" variables in the vertex shader and "in" variables in the fragment shader. And the variable gl_FragColor is replaced by an "out" variable in the fragment shader. The use of the terms "in" and "out" are actually more appropriate to systems with additional pipeline stages, where "out" variables from one stage can become "in" variables to the next stage. In any case, people still use the terms attribute and varying when discussing WebGL, even if it is using GLSL ES 3.00.
6.1.4 Values for Uniform Variables
It's time to start looking at some actual WebGL code. We will concentrate on the JavaScript side first, but you need to know a little about GLSL. GLSL has some familiar basic data types: float, int, and bool. But it also has some new predefined data types to represent vectors and matrices. For example, the data type vec3 represents a vector in 3D. The value of a vec3 variable is a list of three floating-point numbers. Similarly, there are data types vec2 and vec4 to represent 2D and 4D vectors.
Global variable declarations in a vertex shader can be marked as attribute, varying, or uniform (or as in, out, or uniform in GLSL ES 3.00, but again, we will stick to the 1.00 version for the time being). A variable declaration with none of these modifiers defines a variable that is local to the vertex shader. Global variables in a fragment can optionally be uniform or varying, or they can be declared without a modifier. A varying variable should be declared in both shaders, with the same name and type. This allows the GLSL compiler to determine what attribute, uniform, and varying variables are used in a shader program.
The JavaScript side of the program needs a way to refer to particular attributes and uniform variables. The function gl.getUniformLocation can be used to get a reference to a uniform variable in a shader program, where gl refers to the WebGL graphics context. It takes as parameters the identifier for the compiled program, which was returned by gl.createProgram, and the name of the uniform variable in the shader source code. For example, if prog identifies a shader program that has a uniform variable named color, then the location of the color variable can be obtained with the JavaScript statement
colorUniformLoc = gl.getUniformLocation( prog, "color" );
The location colorUniformLoc can then be used to set the value of the uniform variable. For example:
gl.uniform3f( colorUniformLoc, 1, 0, 0 );
The function gl.uniform3f is one of a family of functions that can be referred to as a group as gl.uniform*. This is similar to the family glVertex* in OpenGL 1.1. The * represents a suffix that tells the number and type of values that are provided for the variable. In this case, gl.uniform3f takes three floating point values, and it is appropriate for setting the value of a uniform variable of type vec3. The number of values can be 1, 2, 3, or 4. The type can be "f" for floating point or "i" for integer. (For a boolean uniform, you should use gl.uniform1i and pass 0 to represent false or 1 to represent true.) If a "v" is added to the suffix, then the values are passed in an array. For example,
gl.uniform3fv( colorUniformLoc, [ 1, 0, 0 ] );
There is another family of functions for setting the value of uniform matrix variables. We will get to that later.
The value of a uniform variable can be set any time after the shader program has been compiled, and the value remains in effect until it is changed by another call to gl.uniform*.
If the string that is passed as the second parameter gl.getUniformLocation is not the name of a uniform variable in the shader programs, then the return value is null. The return value can also be null if the uniform variable is declared in the shader source code but is not "active" in the program. A variable that is declared but not actually used is not active, and it does not get a location in the compiled program. This has occasionally caused problems for me, when I commented out part of a shader program for debugging purposes, and accidentally made a variable inactive by doing so.
6.1.5 Values for Attributes
Turning now to attributes, the situation is more complicated, because an attribute can take a different value for each vertex in a primitive. The basic idea is that the complete set of data for the attribute is copied in a single operation from a JavaScript array into memory that is accessible to the GPU. Unfortunately, setting things up to make that operation possible is nontrivial.
First of all, a regular JavaScript array is not suitable for this purpose. For efficiency, we need the data to be in a block of memory holding numerical values in successive memory locations, and regular JavaScript arrays don't have that form. To fix this problem, a new kind of array, called typed arrays, was introduced into JavaScript. We encountered typed arrays when working with three.js in the Chapter 5. There is a short introduction to typed arrays in Subsection 5.1.4. A typed array has a fixed length, which is assigned when it is created, and it can only hold numbers of a specified type. There are different kinds of typed array for different kinds of numerical data. For now we will use Float32Array, which holds 32-bit floating point numbers. Once you have a typed array, you can use it much like a regular array, but when you assign any value to an element of a Float32Array, the value is converted into a 32-bit floating point number. If the value cannot be interpreted as a number, it will be converted to NaN, the "not-a-number" value.
Before data can be transferred from JavaScript into an attribute variable, it must be placed into a typed array. When possible, for efficiency, you should work with typed arrays directly, rather than working with regular JavaScript arrays and then copying the data into typed arrays.
For use in WebGL, the attribute data must be transferred into a VBO (vertex buffer object). VBOs were introduced in OpenGL 1.5 and were discussed briefly in Subsection 3.4.4. A VBO is a block of memory that is accessible to the GPU. To use a VBO, you must first call the function gl.createBuffer() to create it. For example,
colorBuffer = gl.createBuffer();
Before transferring data into the VBO, you must "bind" the VBO:
gl.bindBuffer( gl.ARRAY_BUFFER, colorBuffer );
The first parameter to gl.bindBuffer is called the "target." It specifies how the VBO will be used. The target gl.ARRAY_BUFFER is used when the buffer is being used to store values for an attribute. Only one VBO at a time can be bound to a given target.
The function that transfers data into a VBO doesn't mention the VBO—instead, it uses the VBO that is currently bound. To copy data into that buffer, use gl.bufferData(). For example:
gl.bufferData(gl.ARRAY_BUFFER, colorArray, gl.STATIC_DRAW);
The first parameter is, again, the target. The data is transferred into the VBO that is bound to that target. The second parameter is the typed array that holds the data on the JavaScript side. All the elements of the array are copied into the buffer, and the size of the array determines the size of the buffer. Note that this is a straightforward transfer of raw data bytes; WebGL does not remember whether the data represents floats or ints or some other kind of data.
The third parameter to gl.bufferData is one of the constants gl.STATIC_DRAW, gl.STREAM_DRAW, or gl.DYNAMIC_DRAW. It is a hint to WebGL about how the data will be used, and it helps WebGL to manage the data in the most efficient way. The value gl.STATIC_DRAW means that you intend to use the data many times without changing it. For example, if you will use the same data throughout the program, you can load it into a buffer once, during initialization, using gl.STATIC_DRAW. WebGL will probably store the data on the graphics card itself where it can be accessed most quickly by the graphics hardware. The second value, gl.STEAM_DRAW, is for data that will be used only once, or at most a few times. (It can be "streamed" to the card when it is needed.) The value gl.DYNAMIC_DRAW is somewhere between the other two values; it is meant for data that will be used multiple times, but with modifications.
Getting attribute data into VBOs is only part of the story. You also have to tell WebGL to use the VBO as the source of values for the attribute. To do so, first of all, you need to know the location of the attribute in the shader program. You can determine that using gl.getAttribLocation. For example,
colorAttribLoc = gl.getAttribLocation(prog, "a_color");
This assumes that prog is the shader program and "a_color" is the name of the attribute variable in the vertex shader. This is entirely analogous to gl.getUniformLocation (except that the return value is an integer, and is -1 if the requested attribute does not exist or is not active).
Although an attribute usually takes different values at different vertices, it is possible to use the same value at every vertex. In fact, that is the default behavior. The single attribute value for all vertices can be set using the family of functions gl.vertexAttrib*, which work similarly to gl.uniform*. In the more usual case, where you want to take the values of an attribute from a VBO, you must enable the use of a VBO for that attribute. This is done by calling
gl.enableVertexAttribArray( colorAttribLoc );
where the parameter is the location of the attribute in the shader program, as returned by a call to gl.getAttribLocation(). This command has nothing to do with any particular VBO. It just turns on the use of buffers for the specified attribute. Often, it is reasonable to call this method just once, during initialization. Use of data from the VBO can be turned off by calling
gl.disableVertexAttribArray( colorAttribLoc );
Finally, before you draw a primitive that uses the attribute data from a VBO, you have to tell WebGL which buffer contains the data and how the bits in that buffer are to be interpreted. This is done with gl.vertexAttribPointer(). The VBO must be bound to the ARRAY_BUFFER target when this function is called. For example,
gl.bindBuffer( gl.ARRAY_BUFFER, colorBuffer );
gl.vertexAttribPointer( colorAttribLoc, 3, gl.FLOAT, false, 0, 0 );
Assuming that colorBuffer refers to the VBO and colorAttribLoc is the location of the attribute, this tells WebGL to take values for the attribute from that buffer. Often, you will call gl.bindBuffer() just before calling gl.vertexAttribPointer(), but that is not necessary if the desired buffer is already bound.
The first parameter to gl.vertexAttribPointer is the attribute location. The second is the number of values per vertex. For example, if you are providing values for a vec2, the second parameter will be 2 and you will provide two numbers per vertex; for a vec3, the second parameter would be 3; for a float, it would be 1. The third parameter specifies the type of each value. Here, gl.FLOAT indicates that each value is a 32-bit floating point number. Other values include gl.BYTE, gl.UNSIGNED_BYTE, gl.UNSIGNED_SHORT, and gl.SHORT for integer values. Note that in WebGL 1.0, all attributes are floating point values; if you provide integer values for an attribute, they will be converted to floating point. The parameter value should match the data type in the buffer. For example, if the data came from a Float32Array, then the parameter should be gl.FLOAT. For the last three parameters in a call to gl.vertexAttribPointer, I will always use false, 0, and 0. These parameters add flexibility that I won't need; you can look them up in the documentation if you are interested. (The false parameter has to do with how integer values are converted into floating point values.)
In WebGL 2.0, attribute variables can have integer type. When gl.vertexAttribPointer() is used to configure an attribute, the values provided for the attribute will always be converted to floating point, so it is inappropriate for integer-valued attributes. For use with integer-valued attributes, WebGL 2.0 introduces a new function, gl.vertexAttribIPointer() that works correctly with integer data.
There is a lot to take in here. Using a VBO to provide values for an attribute requires six separate commands, and that is in addition to generating the data and placing it in a typed array. Here is the full set of commands:
colorAttribLoc = gl.getAttribLocation( prog, "a_color" );
colorBuffer = gl.createBuffer();
gl.enableVertexAttribArray( colorAttribLoc );

gl.bindBuffer( gl.ARRAY_BUFFER, colorBuffer );
gl.vertexAttribPointer( colorAttribLoc, 3, gl.FLOAT, false, 0, 0 );
gl.bufferData( gl.ARRAY_BUFFER, colorArray, gl.STATIC_DRAW );
However, the six commands will not always occur at the same point in the JavaScript code. The first three commands are often done as part of initialization. gl.bufferData would be called whenever the data for the attribute needs to be changed; it might be used just once during initialization, or it might be used whenever the data needs to be modified. gl.bindBuffer must be called before gl.vertexAttribPointer or gl.bufferData, since it establishes the VBO that is used by those two commands. Remember that all of this must be done for every attribute that is used in the shader program.
6.1.6 Drawing a Primitive
After the shader program has been created and values have been set up for the uniform variables and attributes, it takes just one more command to draw a primitive. One way to do that is with the function gl.drawArrays:
gl.drawArrays( primitiveType, startVertex, vertexCount );
The first parameter is one of the seven constants that identify WebGL primitive types, such as gl.TRIANGLES, gl.LINE_LOOP, and gl_POINTS. The second and third parameters are integers that determine which subset of available vertices is used for the primitive. Before calling gl.drawArrays, you will have placed attribute values for some number of vertices into one or more VBOs. When the primitive is rendered, the attribute values for enabled attributes are pulled from the VBOs. The startVertex is the starting vertex number of the data within the VBOs, and vertexCount is the number of vertices in the primitive. Often, startVertex is zero, and vertexCount is the total number of vertices for which data is available. For example, the command for drawing a single triangle might be
gl.drawArrays( gl.TRIANGLES, 0, 3 );
The use of the word "array" in gl.drawArrays and gl.ARRAY_BUFFER might be a little confusing, since the data is stored in vertex buffer objects rather than in JavaScript arrays. When glDrawArrays was first introduced in OpenGL 1.1, it used ordinary arrays rather than VBOs. Starting with OpenGL 1.5, glDrawArrays could be used either with ordinary arrays or VBOs. In WebGL, support for ordinary arrays was dropped, and gl.drawArrays can only work with VBOs, even though the name still refers to arrays.
We encountered the original version of glDrawArrays in Subsection 3.4.2. That section also introduced an alternative function for drawing primitives, glDrawElements, which can be used for drawing indexed face sets. A gl.drawElements function is also available in WebGL. With gl.drawElements, attribute data is not used in the order in which it occurs in the VBOs. Instead, there is a separate list of indices that determines the order in which the data is accessed.
To use gl.drawElements, an extra VBO is required to hold the list of indices. When used for this purpose, the VBO must be bound to the target gl.ELEMENT_ARRAY_BUFFER rather than gl.ARRAY_BUFFER. The VBO will hold integer values, which can be of type gl.UNSIGNED_BYTE or gl.UNSIGNED_SHORT (or, for WebGL 2.0, gl.UNSIGNED_INT). The values can be loaded from a JavaScript typed array of type Uint8Array, for gl.UNSIGNED_BYTE, or Uint16Array, for gl.UNSIGNED_SHORT. Creating the VBO and filling it with data is again a multistep process. For example,
elementBuffer = gl.createBuffer();
gl.bindBuffer( gl.ELEMENT_ARRAY_BUFFER, elementBuffer );
let data = new Uint8Array( [ 2,0,3, 2,1,3, 1,4,3 ] );
gl.bufferData( gl.ELEMENT_ARRAY_BUFFER, data, gl.STREAM_DRAW );
Assuming that the attribute data has also been loaded into VBOs, gl.drawElements can then be used to draw the primitive. A call to gl.drawElements takes the form
gl.drawElements( primitiveType, count, dataType, startByte );
The VBO that contains the vertex indices must be bound to the ELEMENT_ARRAY_BUFFER target when this function is called. The first parameter to gl.drawElements is a primitive type such as gl.TRIANGLE_FAN. The count is the number of vertices in the primitive. The dataType specifies the type of data that was loaded into the VBO; it will be either gl.UNSIGNED_SHORT or gl.UNSIGNED_BYTE. The startByte is the starting point in the VBO of the data for the primitive; it is usually zero. (Note that the starting point is given in terms of bytes, not vertex numbers.) A typical example would be
gl.drawElements( gl.TRIANGLES, 9, gl.UNSIGNED_BYTE, 0 );
We will have occasion to use this function later. If you find it confusing, you should review Subsection 3.4.2. The situation is much the same in WebGL as it was in OpenGL 1.1.
6.1.7 WebGL 2.0: Vertex Array Objects
The large number of functions needed to work with attributes can seem excessive. The situation is worse in a program that draws several different objects. Each object can require its own buffers and its own settings for attribute pointers. Before drawing each object, it would be necessary to call gl.bindBuffer() and gl.vertexAttribPointer() for each attribute. A typical 3D graphics program would use attributes for vertex coordinates, normal vectors, material properties, and texture coordinates. So, there would be a lot of function calls for each object.
To help with this situation, WebGL 2.0 introduced Vertex Array Objects (VAOs). A VAO is a section of memory, typically stored on the graphics card. It holds settings that are used by rendering functions such as gl.drawArrays(). This includes the enabled state of each attribute, references to the buffers used for the attribute data, and the values of all properties that are set by calling gl.vertexAttribPointer(). It also includes the settings and a reference to the buffer used by gl.drawElements(), as well as the attribute divisors that are discussed in the next subsection.
WebGL 2.0 has a default VAO, which it uses when no other VAO has been selected. To use an alternative VAO, you first have to create it, by calling gl.createVertexArray():
vao = gl.createVertexArray();
The return value, vao, is an identifier for the VAO that has been created. In the new VAO, all properties have their default values. In particular, all vertex attributes are disabled and have no associated buffers. To actually use a VAO, you need to bind it:
gl.bindVertexArray(vao);
Functions that affect or use attributes apply to the VAO that is currently bound. For example, the settings in a call to gl.vertexAttribPointer() are stored in the current VAO. And a call to gl.drawArrays() gets all the data that it needs to draw a primitive from the current VAO. A program can switch from one VAO to another at any time simply by calling gl.bindVertexArray. To go back to using the default VAO, a program can call gl.bindVertexArray(0).
The idea is that a program that draws several objects can use a different VAO for each object. The VAO for an object must be bound when the settings for the object are configured. But before drawing the object, the program simply needs to bind the VAO for that object. That single function call replaces a potentially a large number of function calls that would be needed to restore the appropriate settings for each attribute individually. The advantage is more than just a more nicely organized program—it is also much more efficient, since only one command needs to be sent to the GPU to configure all of the attributes.
The sample WebGL 2.0 program webgl/VAO-test-webgl2.html uses a different VAO for each of six different objects. That program uses many techniques that we have not yet covered, but you can look at the drawModel() function to see how it uses VAOs and VBOs.
6.1.8 WebGL 2.0: Instanced Drawing
It's common for a scene to contain multiple copies of the same primitive (that is, using the same vertex coordinates), but with different transformations, colors, or other properties for each copy. WebGL 2.0 makes it possible to draw all those copies with a single function call. This is called instanced drawing or instancing, and the individual copies of the primitive are called instances. The functions that use instanced drawing are gl.drawArraysInstanced() and gl.drawElementsInstanced().
Instanced properties—the properties that vary from one instance to another—are things that would likely be uniform variables when drawing each instance separately. That is, each instance gets just one value of the property that applies to all the vertices of the instance. Nevertheless, the properties are represented by attribute variables in the shader program, not uniform variables, and they are configured as attributes.
To specify that an attribute is an instanced property, you just need to specify a "divisor" for that attribute. This is done by calling gl.vertexAttribDivisor:
g.vertexAttribDivisor( attribID, divisor );
Here, attribID is the identifier for the attribute, as returned by gl.getAttribLocation(). The divisor is a non-negative integer. Passing zero as the divisor will turn off instancing for the attribute. If divisor is positive, then each value of the attribute will apply to that many instances. For example, if divisor is 3, then the first entry in the attribute value array applies to the first, second, and third instances; the second value in the array applies to the fourth, fifth, and sixth instances; and so on. In practice, the value of divisor is usually one, meaning that each instance has its own entry in the attribute value array.
For an instanced property, in addition to setting the divisor, it is still necessary to enable the attribute, load data for it into a VBO, and configure it with gl.vertexAttribPointer. And, of course, it is necessary to draw the primitive using gl.drawArraysInstanced() or gl.drawElementsInstanced(), and not with gl.drawArrays() or gl.drawElements().
The sample WebGL 2.0 program webgl/instancing-test-webgl2.html is an example of instanced drawing. (Again, there is a lot in the program that you won't understand until we have covered more of WebGL). The program draws 30 colored disks, where a disk is approximated by a primitive of type gl.TRIANGLE_FAN. Three attributes are used: an attribute that holds the coordinates of the vertices, an instanced attribute that holds the colors for the disks, and an instanced attribute that holds a different translation for each disk.
Another point of interest in the program is its used of vertex buffer objects. The disks can be animated. The disks move, but their colors don't change. Since the colors don't change, the color values for the disks are loaded into a VBO once, during program initialization. The usage parameter in gl.bufferData is set to gl.STATIC_DRAW because the data will not be modified. However, because the disks are moving, the values for the translations of the disks have to change in each frame. So, new data is loaded into the corresponding VBO for each frame, with usage gl.STREAM_DRAW because the data that is being loaded will only be used once.
Finally, I should note that VAOs and instancing require WebGL 2.0, but the same functionality is available in many implementations of WebGL 1.0 as optional extensions. Webgl extensions will be discussed in Section 7.5.